


- Total
- General
- Arts
- Book
- Culture
- Economy
- Essay
- Fun/Joke
- History
- Hobbies
- Info
- Life
- Medical
- Movie
- Music
- Nature
- News
- Notice
- Opinion
- Philosophy
- Photo
- Poem
- Politics
- Science
- Sports
- Travel
Notice How to use Rich Text Editor
2016.06.28 08:07
|
How to use "Rich Text Editor"
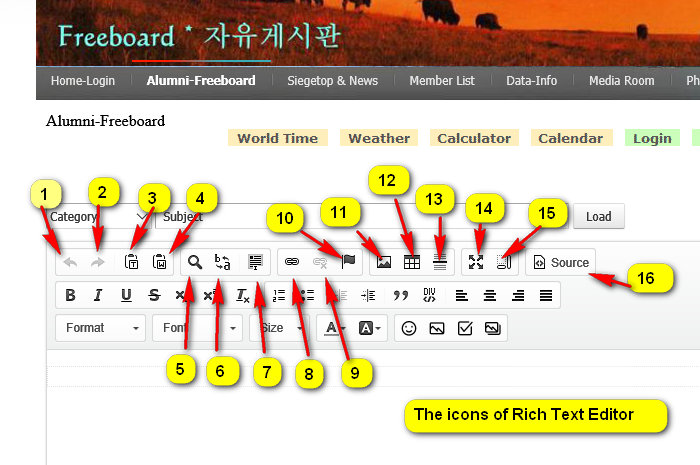
By utilizing the "Rich Text Editor" icons, you can do a lot of things that you could not do before. And you can do it so easily by just clicking the icons. You can format the text (size, color, face, formatting.. and etc) very easily and fast. Here, I mention only the complicated ones that you are not familiar with. They are in the first row of the three rows of the formatting icons. Please try to practice and learn. You will look like an expert in no time. The icons at the bottom row are simple formatting icons that you may be already familiar with already. So, I did not add any explanations for them. You can try to see how they work by marking a word or group of words and click one of the icons and see what happens. 1. Undo: If you add or delete something and changed your mind to get it back, this button will recover whatever you have done and let you go back to the previous state... 2. Redo: This button will re-do whatever you did earlier again, even "Undo". 3. Paste as Plain Text: When you bring a block copied text from some other website or program (such as Window Word), this will get rid of all the garbage codes that come with the copy. The text will be very clean without all the redundant and unnecessary HTML codes. Thus, it is very convenient to handle and the file size becomes very small. Your webmaster will really love you if you use it. It's also good for the website too. 4. Paste from Word: I have not tried this myself. This probably will bring the Word's formatting together. If you know how to handle text formatting, the former #3 is preferable for the website. But if you don't know "how to", use this button to keep the same formattings in the Word documents. 5. Find: If you want to find a certain word, number, or etc. in the middle of a big text. 6. Replace: This is really a handy tool. Suppose there are 20 of "size=3" in the codes (or texts) and you want to change all of them to "size=4", you can use this to change the whole thing in a second at once, instead of changing it one by one. Another example is to change numerous "red" in the text to "blue", you can do it all at once. Please develop creative uses of this wonderful time-saving function. You fill the small window with "what is to be replaced" and "what is to go in place of the former", and then click "replace all". 7. Select All: Just by simply clicking at this icon, you can mark the whole text (or codes) at once. You don't have to drag your mouse from the beginning to the end of a big text. Then you can copy and/or paste where you want them. 8. Link: Put your mouse cursor at a place in the webpage, and click this button to put a link of an URL that you want to insert. This will put a nice colored link of a webpage, such as YouTube URL, an URL of an article, and etc. After inserting the link, by clicking this link, you can go to the place of the URL directly. You do not have to use the link code of "a href=xxx.... target=_blank ..." 9. Unlink: Remove the link. Mark the previously set link and click this button to get rid of the link in it. Now, the link becomes just a piece of text without linking ability. Simply to say, it undo the link without removing the link text. 10. Anchor: Similar to marking by placing a flag at an important word, number, or other subject and give a name to find it easily later. 11. Image: Another great icon. If you want to place a certain picture, put your mouse cursor in the desired location on the webpage and click this button. In the "image" window, you can specify the URL of the picture, size, border, free margin around the picture so that text does not come in contact (hspace, vspace) with the picture, and also choose the location of the picture at left, right, or center... 12. Table: This creates a table for you so that you can put all your text and pictures inside a frame. You don't have to write a table tag HTML codes. This can be a great help for those who have not learned to create table frame. You make the table first and then put your texts or pictures inside of it. Please practice! 13. Insert Horizontal Line: Put the mouse cursor at the desired location and click to insert a horizontal line of various thickness where your mouse cursor is. You can choose the thickness from a small window. 14. Maximize and Minimize: by clicking this icon you can make your work area (window) larger or smaller. 15. Show Blocks: I do not know about this one yet. Probably, this is to set an area for certain focal text region. Even for an expert, setting an area in the middle of the text field is not easy. If that's the case, it can be very useful. Someday I will figure it out. 16. Source: When you write or copy HTML codes to the webpage you are making, you click this icon to turn on "HTML code insertion". Also, click this on to see the underlying HTML codes and add necessary edits. An absolute necessity when you write with codes. 17-the Rest: These are fairly simple things. Please try to see what they are on your own. |

Comment 3
-
황규정*65
2016.07.19 11:52
-
Sorry, I just came back home at 10: 00 PM my time.
I tried it just now. It's OK here. It's not like what happened on your computer.
I mark the text (highlighted blue) first, then click the down arrow (or the "A" icon),
then I get the whole palettes of color cubes.
I move my mouse cursor to the color I want and click. And it works just like below.
What I did is exactly the same as you did. You did perfectly well.
Maybe, something wrong with your computer or your mouse.
Those small color palettes should not disappear.
Maybe, just turn your computer off, wait a while and turn it on.
Tomorrow morning, it may work?? (Doc, What a dumb thing for me to say !)
-
황규정*65
2016.07.19 22:41
This is a test. KJ.
As you can see, I was able to do it with my laptop, but
I can't do it with my desktop, although they both are Windows 8.1 and IE 11.
Thanks for your input! WM! KJ
| No. | Subject | Date | Author | Last Update | Views |
|---|---|---|---|---|---|
| Notice | How to write your comments onto a webpage [2] | 2016.07.06 | 운영자 | 2016.11.20 | 18193 |
| Notice | How to Upload Pictures in webpages | 2016.07.06 | 운영자 | 2018.10.19 | 32347 |
| » | How to use Rich Text Editor [3] | 2016.06.28 | 운영자 | 2018.10.19 | 5924 |
| Notice | How to Write a Webpage | 2016.06.28 | 운영자 | 2020.12.23 | 43840 |
| 52 | Romantic Germany I, 2009 [8] | 2009.12.13 | 조성구*65 | 2009.12.13 | 7861 |
| 51 | 2009년 6월 캐나다 록키 여행 [10] | 2009.12.10 | 계기식*72 | 2009.12.10 | 6753 |
| 50 | 충남 태안에서 식사를 [6] | 2009.12.10 | 유석희*72 | 2009.12.10 | 7413 |
| 49 | Los Verdes GC, LA County, CA 2009 [4] | 2009.12.06 | 조동준*64 | 2009.12.06 | 7495 |
| 48 | 제주 기행( 마지막 편) [6] | 2009.11.27 | 유석희*72 | 2009.11.27 | 7542 |
| 47 | 제주 기행( III ) [2] | 2009.11.21 | 유석희*72 | 2009.11.21 | 7973 |
| 46 | 또 다른 제주이야기( I ) | 2009.11.19 | 유석희*72 | 2009.11.19 | 8200 |
| 45 | 제주 기행( II ) [2] | 2009.11.19 | 유석희*72 | 2009.11.19 | 8521 |
| 44 | Utah Hiking 2009 (2) - Onion Creek & Thompson Canyon | 2009.11.17 | 운영자 | 2009.11.17 | 3533 |
| 43 | 제주 기행 ( I ) [3] | 2009.11.16 | 유석희*72 | 2009.11.16 | 8679 |
| 42 | Utah Hiking 2009 (1) - Corona Arch & Bowtie Arch, Moab [4] | 2009.11.14 | 운영자 | 2009.11.14 | 3805 |
| 41 | 남인도이야기( III ) | 2009.11.13 | 유석희*72 | 2009.11.13 | 8136 |
| 40 | [스위스 여행기] (5) [도시의 볼거리들(하)] | 2009.11.11 | 심영보*61 | 2009.11.11 | 8729 |
| 39 | [스위스 여행기] (4) [도시의 볼거리들(상)] | 2009.11.11 | 심영보*61 | 2009.11.11 | 9538 |
| 38 | 남인도 이야기( II ) [2] | 2009.11.09 | 유석희*72 | 2009.11.09 | 8111 |
| 37 | 남인도 이야기( I ) | 2009.11.07 | 유석희*72 | 2009.11.07 | 7639 |
| 36 | [스위스 여행기] (3)[Matterhorn산 관광] | 2009.11.07 | 심영보*61 | 2009.11.07 | 8744 |
| 35 | [스위스 여행기] (2)[Jungfrau산 관광] | 2009.11.07 | 심영보*61 | 2009.11.07 | 8359 |
| 34 | [스위스 여행기] (1) [스위스의 인상] | 2009.11.04 | 심영보*61 | 2009.11.04 | 8489 |
| 33 | Osaka Monokadari [4] | 2009.11.02 | 유석희*72 | 2009.11.02 | 7765 |
One Question for WM
When I like to use 'text color', I highlight text, which I like to color and
click text color icon and tried to select the color, then as soon as my mouse
moves, the color pad disappears. How can I use properly? KJ